Burrow/ Tunnel Camera System
Description:
A burrow/tunnel camera system employs compact cameras to monitor wildlife activity within burrows or tunnels, aiding in ecological research and conservation efforts by capturing footage of elusive species’ behaviors in their natural habitats. These systems offer invaluable insights into underground ecosystems, facilitating scientific understanding and management strategies
specifications
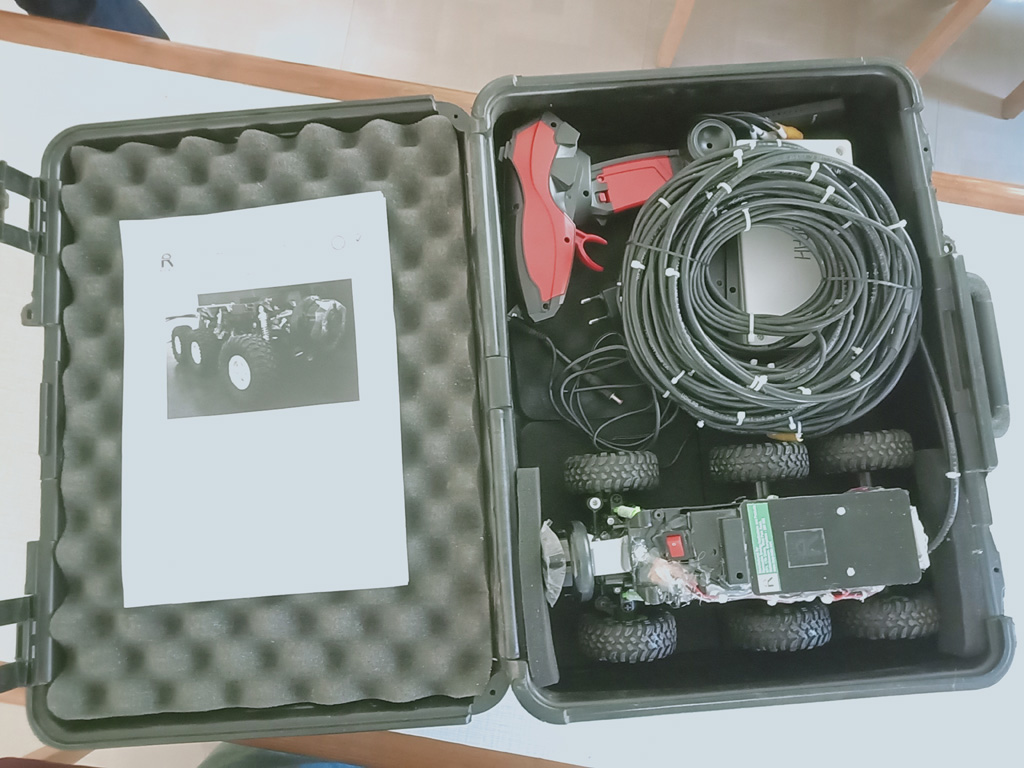
Length x Width x Height | 300 x 150 x 110 [Dimensions in MM] |
Front Camera | Wireless Infrared camera powered by external Li-ion battery with On Board video recording microSD slot |
Rear Camera | Low Light camera with LED Light for vehicle reversing powered by onboard converter |
OnBoard Vehicle Battery | 4V 700mAH Li-Ion Battery |
External Power Source to the Vehicle | 7.2V 10AH Li-Ion Battery Pack to power the entire vehicle including the onboard devices like camera and LED Light |
Vehicle Control | RF based remote with Steering control and Forward and Reverse control |
Power and Reverse video feed cable length | 15 Mtrs [50 Feet] of 1SQMM x 3 Core Copper cable with Separate Cable for Reverse Camera Video Feed |
Video Capture for Front Camera | V380 Pro Android App – Available on Google Play Store |
Video Capture for Rear Camera | Easier Cap USB based capture device with Desktop software for video capture |
Li-Ion Battery Charger | 220VAC Adaptor with Battery Charging and Battery Full Indication |
Method of Use
Front Camera Configuration:
The front camera is an infrared camera with a built inn microSD card slot for on board video
storage.
This camera is a wifi camera that relays real time video feed to a smart phone with the camera
software installed.
The phone can be used to see the real time video as well as to record the
video.
Software Installation:
Go to Google Play store on your android smart phone and search for “V380 Pro” App. Download and install the V380 Pro App
IP Camera Connection:
Power ON the vehicle by switching ON the RED switch behind the camera and then Switch ON
the Main Battery Input from the white box.
Once the camera boots up, there will be a voice message which says “System is Starting”,
“Access Point Preparing” and Finally “Access Point Ready”
Go to wifi settings on the phone and select MV49486097 and connect to it.
Open the V380 Pro App on the phone
On the Login Page – Click on “Try without an account”
On the Notice Page , Click on “ Continue”
On the screen page , it should show “Device is OnLine.”
If using the APP for the first time, there will be a Pop-up that will ask for login and password:
Login ID is: admin
Password: abc123
Click on the center of the screen to start the camera. At the bottom of the screen there is a “Record” icon. Click on that to record the video on the phone as well as see the live view of the vehicle moving.
Method of Use
Rear Camera Configuration:
Download the Easycapture software
Click on the Honestech TVR 2.5 executable and install the application
Plug in the Easy Capture Device to the USB port of the laptop and connect the Yellow Video
video connector of the capture device to the Yellow Video Out connector of the extension cable
attached to the vehicle.
Once the Application is installed, go to desktop and click on the “Honestech TVR 2.5” icon

Once the application opens, go to settings by clicking on the “Spanner / Wrench” ICON

In the Property page, select Video source:
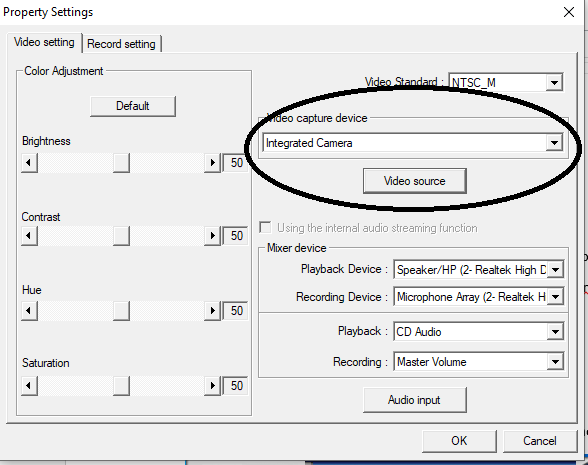
To record the video , you can click on the RED record button
Charging the Main battery:
The Main battery which is housed in the white box is a 7.2V 10AH Li-ion battery.
On the side of the box there is a socket that says “Solar / Adaptor”. Plug in the Battery charger
adaptor included in the kit for charging this battery.
When the adaptor is connect and charging , the led on the adaptor will glow RED, once the
charging is complete of disconnected from the battery the LED will turn GREEN.
The battery should last more than 2-3 hrs on a full charge
Charging the On Board Battery: [YELLOW battery]
There is small Yellow colored Li-ion battery on the vehicle which is used as a stabilizer for the
camera input. This is given so that the front wifi camera does not get affected by the drop in
voltage when the vehicle is in motion.
To charge this battery, disconnect the battery wire and connect it to the USB charger included in
the accessories kit. Connect the USB connector to a cell phone adaptor USB socket or a laptop
USB socket.
The Yellow stabilizer battery is a 4.8V 700mAH Battery
Operating the Vehicle:
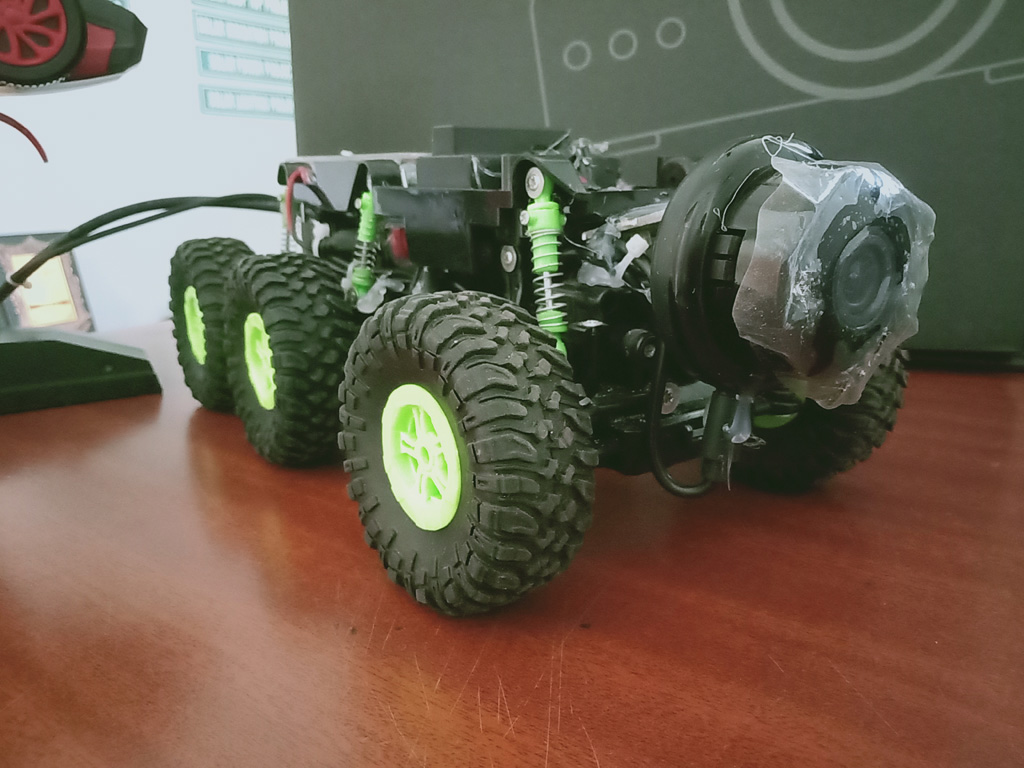
The vehicle is a 4 x 4 model with Front 2 Wheels and the Rear 2 Wheels always in drive mode.
The center 2 wheels provide support to the vehicle in places where it has to climb over small
obstacles. These wheels are not powered.
The RF control provided has a line of sight control for upto 100 Mtrs but that reduces when the
vehicle is in the tunnel.
The cable provided with the vehicle for both power as well as rear camera video feed is extremely
strong and can be used to pull the vehicle back gently in case of system power malfunction and
vehicle needs to be retrieved.
First connect the lengthy power cable to the white battery box to the socket marked “LOAD” and
turn on the Switch .
Then turn ON the little RED switch on the vehicle. This provides stablized power to the camera.
Once the cameras boot up and the live video feeds are available on the phone and laptop, use
the remote control to drive the vehicle into the tunnel.
The Wheel on the remote control is for steering control.
Backward press of the remote trigger moves the vehicle forward and Forward push of the trigger
moves the vehicle backward.
Maneuver the vehicle very slowly into the tunnel and ensure that there is enough free cable. The
LED light on the rear camera will stay ON through out the operation . It will not startle the resident
of the tunnel as the light is backward facing.
During maneuvering , if the vehicle gets stuck, move the vehicle in the Reverse direction and
Forward direction to free it from the obstacle.
Care has been taken to insulate the parts from dusty conditions in the tunnel. After every operation, gently dust the vehicle before storing it. Ensure that the little RED switch on the vehicle is turned OFF before storing.
If you require any support, please call me on +91 9880517370
Gallery